This screen is used to Capture a New Lease in respect of a Unit, or to maintain a previously captured Unit Lease. It used for both Residential and Commercial Units - the Commercial screen is discussed after the Residential screen. Only a residential lease can be printed directly off the system, as commercial leases tend to contain too much variance to have a standardised commercial lease captured in the system.
Please note that the screen displays below are examples and the data displayed in them does not necessarily flow from one example screen to another.
When a new lease is taken on by means of this screen, all of the relevant information is saved and and is thus accessible from the Maintain/Setup Unit Screen. However, changes made to existing leases by means of this screen do not update the information on the Unit Maintenance Screen. Lease maintenance should therefore preferably be carried out by means of the Unit Maintenance Screen.
The Take-on option is only available if the Unit is a Marketing Unit. If the Unit is active, the system will force the use of the maintenance option.
The following images are the Lease Maintenance screen and certain of its sub-screens:
Residential
Some accounts are set up to perform an automatic credit check on a prospective tenant by means of TPN before allowing a new lease to be captured. If your account is set up in this way, you will be required to enter the Prospective Tenant's Identity Number and other key information. After the credit check has been submitted, the screen will display the reply from TPN. Only key data will be displayed, which is usually sufficient to make a decision as to whether or not the tenant in question is credit-worthy. TPN will send an email containing the full credit check information to the nominated email address for your company. At times it may be necessary to consult that email before making a final decision. If so, leave the display on your screen, obtain a copy of the email and make your decision. To proceed, press the 'Esc' key, after which you will be asked for the acceptance password. If you accept the tenant, type in the password and proceed to the lease capture screen. If not, press 'Esc' to exit.
A detailed description of the TPN key information can be viewed in TPN interpretation codes. TPN access codes are set up on the control flags of Maintain/Setup Division (Agent).
The initial screen - The various fields are self explanatory. This screen will display if the Property type is set to R. The Pro-rata field is set to 'Y'es if the initial period is less than a full month. A line will be added to the fee structure termed 'FIRST RENTAL', with the period being from the occupation date to the end of the first month.
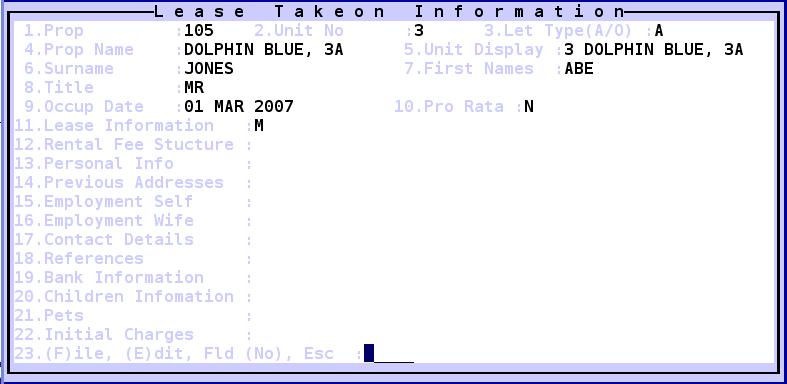
Press 'F3' on Field 11 for the following screen:

Field 1,2 3 and 5 are automatically completed by the system. Field 6 is automatically completed based on the number of months entered in Field 4. Fields 1 to 6 are compulsory fields. If an option is given,the Renewal Option (Field 13) and the Renewal Exercised by Date (Field 14) are important to complete since the situation will have to be monitored. The system contains a utility under Lease Reviews on the Management Level by means of which one can scan for these dates.
Press 'F3' on Field 13 for the following screen. All information captured here is available for other general use within the system, so ensure that the information captured is as complete as possible.

Press 'F3' on Field 15 for the following screen. Salary often helps to assess the tenants ability to afford the rental. Also Consider the wife's income listed under Field 16.

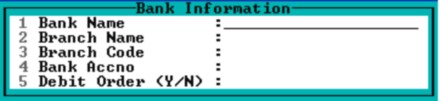
Press 'F3' on Field 19 for the following screen. This information can be used when carrying out a credit check. If the Agent is authorised by the tenant to deduct the rental/levy via a debit order, set the flag in Field 5 to 'Y'. The bank information will then be updated onto the Unit Maintenance Screen.
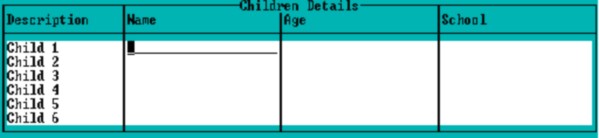
Enter information about the tenant's children under Field 20.
Enter information about the tenant's pets under Field 21.

In Field 22, capture the Initial Charges that will be automatically billed to the new tenant when this screen is 'F'iled. All of these batches are posted into the Cash Period. Remember that the amounts are to be inclusive of VAT where relevant (Deposit and Stamp duty will never include VAT) .

Commercial
The following screen will be displayed if the Property Type is set to 'RCO'.
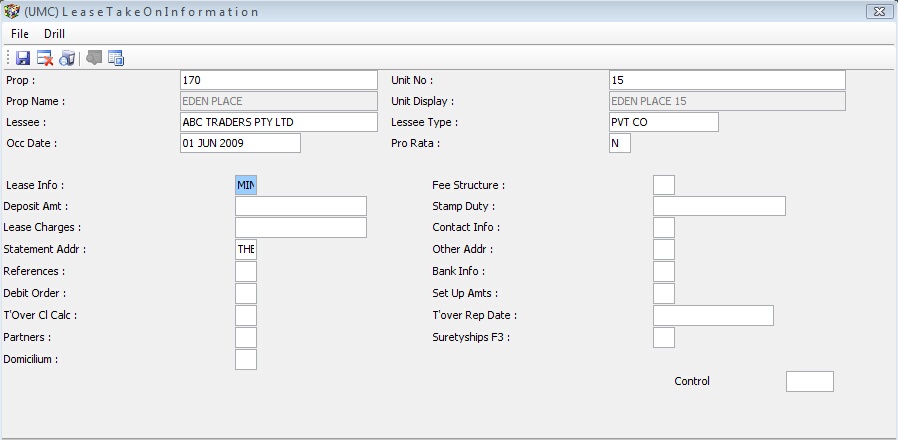
The system will automatically complete Fields 1 to 4.
5. Enter the Lessee Name as it appears on the Lease Agreement.
6. Enter a flag (key letter) to note the legal status of the lessee. e.g. 'S' for Sole Proprietor, or 'PTY' for a PriVATe Company. Press 'F1' for a list of options. Enter 'TBA' if you are uncertain at present and plan to capture the information later. The system contains a scan to pick up all 'TBA's so as to assist with the delayed capture of such information.
7. Enter the Date on which the Lessee takes Occupation of the Unit.
8. Enter 'Y' for Pro Rata if the first month of occupation is less than a full month.
9. Press 'F3' to capture the information in the display window below:

Fields 10 and 17 appear on a Commercial Tenancy Schedule in the relevant columns.
10. Press 'F3' to capture the Fee Structure, i.e. details of the fixed charges in terms of the lease. The following screen appears:

Enter any number of different Fee Descriptions and Periods. It is usually advisable to capture the full period of any lease, and to then capture a new line for each type of fee for the first month after the end of the lease. This prevents a Unit whose lease expires and whose tenant remains in occupation, from not being charged. Alloc, Flag and Excl Units can be ignored on this screen. Any VAT setting in this VAT column overrides the default setting for the Property except where the Property is set to 'N'; then you will not be able to set this to 'Y'. If left blank, the Property Default Setting will apply. The Nnla is the General Ledger Account in the books of the Property to which this fee will be posted. If left blank, it will post to the default account set in the program. The fees set up here are raised when the monthly fee raise is run from the Management Level.
11, 12 and 13. Enter these amounts for record purposes. In certain accounts, these amounts can be billed as Property to Unit Adjustments when the lease is actiVATed. However, this is not usually the case.
14. Press 'F3' to enter the Contact Information for the Tenant.
15. Press 'F3' to enter the Name and Address that will appear on the Unit Statements.
16. Press 'F3' to enter details of any other Address that you would like to record for the Tenant. e.g. A home address.
17. Press 'F3' to capture details of References given by the Tenant to assist in their approval as a Tenant.
18. Press 'F3' to capture the Banking Details used for Reference Checking in approving the Tenant.
19. Press 'F3' to enter Account Details if the amounts due by the Tenant will be collected via Debit Order.
20. Press 'F3' to enter the following setup amounts:
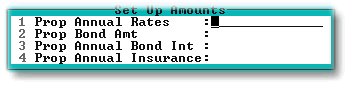
The above amounts can be used if an increase in assessment rates or interest rates is to be recovered. The amounts entered should be the annual amounts for each item.
21. Press 'F3' to enter the Turnover Ranges if applicable:

22. Enter the next Date that any Turnover Report is due. There is a scan to pick up any overdue reports on the Management Reports menu.
23. Press 'F3' to enter Details for the Partners if the Tenant is a Partnership.
24. Press 'F3' to enter Details of any people that have stood as surety for the lessee. These people will automatically receive copies of certain demand letters when sent to a tenant.
25. Press 'F3' to enter any Domicilium Address for the Tenant as selected in the lease agreement.